Risk-first learningIndependent practiceNo membership or sign-in required
Independent student audit copy. This revised Student Edition is still under instructor and learner review. The questions are formative only; formal grades and private answer keys are not available here.
FOREX VISUAL LAB · C02.3
Break, retest, then decision.
A return to former resistance
EURUSD · M15 · BID
What the candles show
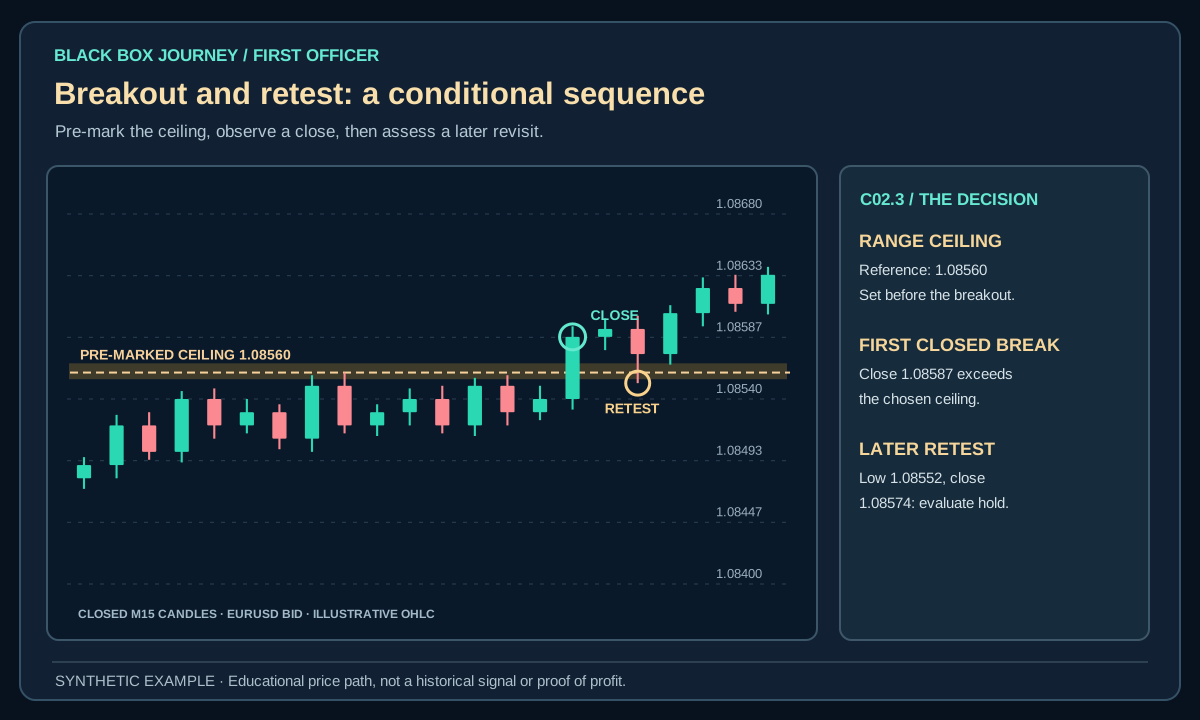
EURUSD closes above 1.08510, returns to the level, then closes back above it. The retest is observable only after those candles have completed.
Important distinction
The illustrated retest bar wicks below 1.08510 and closes above. A 'retest' by itself is not proof that buyers will win.
Define a minimum hold/close requirement before replay; never select successful retests after the fact. Five-decimal quotes and labels follow EURUSD conventions; broker feed conventions vary.
First Officer · C02: Price Action · About 25–30 minutes
Safety rule: A candle formation cannot guarantee a market move. Define the cash loss before interpreting upside.
Your mission today
By the end you can define a breakout and retest using fixed boundaries and completed bars.
Before you start
Use the completed C01 market-structure lessons, a demo price chart and a calculator. Mark reference levels before replay. Every number is imaginary.
1. Understand the pattern
Imagine a crowd leaving a fenced garden. One person stepping across the gate is not proof everyone has moved out. A breakout is a price move beyond a previously defined range under a chosen confirmation rule. A retest is a later revisit of that area. Either may fail.
A breakout occurs when price moves beyond a previously defined boundary; a successful continuation occurs only if subsequent prices accept the new region. A retest may offer a more controlled location than chasing the breakout candle, but strong breaks sometimes never retest. There is no free entry that guarantees both fill and continuation.
2. Worked example: what could be lost?
An imaginary market ranges from 95 to 100. It closes at 101.20 and later revisits 100.10. A proposed long at 100.40 with a stop at 98.80 has 1.60 points of risk. At $10 per point, that is −$16 before fees. A move toward 104 would be +$36 gross, but the boundary might fail instead.
Open the diagram for full-size detail on a mobile screen. All illustrated prices are synthetic unless explicitly sourced as historical market data.
Original Black Box Journey teaching schematic. Imaginary prices and outcomes only.
BLACK BOX JOURNEY · LESSON VISUAL WORKSHOP
See the concept, the decision and the mistake
3 original teaching figures for lesson C02.3. Read each panel in order and compare the chart, calculation or decision with the explanation above. Tap Expand for a full-size review. Diagrams and prices are classroom illustrations, not live market records or validated trading signals.
Loading 3 teaching visuals…
3. Read the full context
Mark the original high and low before any break. Decide whether confirmation needs a complete candle close beyond the area and how far. Set a maximum permitted chase distance. On the retest, require the exact closed-bar behaviour you have written, not any wick touching the old level.
Technical detail: Specify the range boundaries before the break, the required close beyond them, a maximum chase distance and a retest acceptance rule. A valid breakout setup also needs a time limit and a failure condition: prices returning sustainably inside the old range may invalidate the idea. All these rules must be knowable when the signal forms.
4. Watch for the failure case
A breakout candle can become an exhausted move directly into the next resistance. A retest may not occur, so no trade is a valid outcome. Never redraw the original boundary to manufacture a successful case.
Chasing a long breakout candle can create an entry directly into the next resistance. Counting every wick above the boundary as a confirmed breakout inflates historical opportunity counts.
5. Practise a reproducible decision
In a 20-event replay, classify unconfirmed probes, completed breaks, accepted retests and failures. Record exact times, possible stop distance and skipped events.
For comparison, the original source's example illustrates: An educational synthetic chart ranges from 95 to 100, closes at 101.20, retests 100.10 and then moves toward 104. The trader waits for a closed retest candle rather than assuming every touch of 100 is support. With an invalidation at 98.80 and entry at 100.40, the initial risk is 1.60 per unit before costs.
6. Keep the breakout and the retest as separate events
Synthetic EURUSD scenario: A completed H1 boundary sits at 1.08600. An M15 candle closes at 1.08620, above the level. That may count as a breakout under your written rule. The next candle falls to 1.08590 and closes at 1.08610. That is a possible retest because price revisited the old level; it is not proof that resistance has become support. If your rule needs a second close above the boundary, the required condition is now observable.
Risk comes first. Imagine a hypothetical long entered at Ask 1.08625 with a planned Bid stop at 1.08535. The 9-pip planned price risk is −$9 at an invented $1 per pip before costs. A later Bid at 1.08715 would offer +9 pips in a separate imaginary path. Another completed close below 1.08600 could instead undermine the setup.
Practice record: On ten replay segments, capture the initial boundary timestamp, breakout closing price, lowest retest price and the first confirmed retest close. Label each case BREAK, RETEST, FAILED RETEST or NO TRADE using fixed rules. Do not assume a wick touch qualifies as a held retest.
Common mistake
A pattern name alone cannot approve an order. Always require a premarked reference, an exact confirmation rule, a structural failure level and a feasible cash-risk calculation.
Plain-English glossary
Breakout: A defined confirmed move beyond a prior boundary.
Retest: A later price revisit of a previous area.
Acceptance: A chosen observation showing price holding beyond a level.
Chase distance: Maximum distance from the boundary permitted by a plan.
Try it yourself
In a 20-event replay, classify unconfirmed probes, completed breaks, accepted retests and failures. Record exact times, possible stop distance and skipped events. Save every eligible and skipped candidate at the decision timestamp.
PRACTISE · TEST YOUR UNDERSTANDING
Quick check
Select an answer or type your own for each question. Press Submit practice to review the five responses. This is a formative beta exercise, not a graded assessment.
0 / 5 answered
Answer all 5 questions to submit.
What you can now do
Define a breakout and retest using fixed boundaries and completed bars.
State a concrete observation that would disqualify the idea.
Calculate the loss from the proposed entry and stop.
Next lesson
C02.4 · False Breakouts and Trapped Traders. Carry forward the same strict confirmation standard.
Student clarity check
Could you explain the idea in your own words, reproduce the calculation and complete the exercise without seeing an instructor's answer? Does the diagram actually show the concept? Please record exact lesson codes and specific points of confusion for the independent Claude audit.